
Biospecimen Collection
Tasso Kit Instructions for Use
Materials
Materials supplied in Kits
- 1x Biospecimen Bag, Small (pre-labeled)
- 1x Biospecimen Bag, Small
- 1x DS-Biorepository Tasso Kit Biospecimen Form
- 1x Dry Ice Label
- 2x Gauze
- 1x Kit Contents Manifest
- 2x Matrix Tubes with Colorless Caps, 0.5 mL, for plasma (pre-labeled)
- 1x Microcentrifuge Tube for DNA Samples (pre-labeled)
- 1x Microcentrifuge Tube with RNAlaterTM for RNA Samples (pre-labeled)
- 1x Omnigene Tongue Swab
- 2x Tasso+® EDTA Kit, RUO
- 1x Therapak™ Aqui-Pak™ Absorbent Sleeve
- 1x UN3373 Shipping Label
Equipment (Not Provided)
- Class II A2 Biological Safety Cabinet
- -80°C Freezer
- Honeywell Xenon Ultra 1960g Barcode Sanner or Equivalent
- Adjustable Speed Microcentrifuge (Eppendorf 5417 or Equivalent)
- P1000 Pipet
- P200 Pipet
- Timer
Consumables (Not Provided)
- Microcentrifuge Tubes, 1.5 mL
- 1000 uL Barrier Pipet Tips, Sterile
- 200 uL Barrier Pipet Tips, Sterile
- Dry Ice
Specimen Collection
Notes for Lab
Before Visit:
- Check the expiration date on the tongue swab and Tasso devices to ensure they have not expired.
- Bring the kit biospecimen form to record collection details and note any issues during the sample collection.
- If a replacement tube is needed at any time, use a tube from the replacement kit. Fill out the proper replacement kit form (provided in the replacement kits) and attach it to the biospecimen form.
Save the following materials for use in sample return shipments:
- 1x Biospecimen Bag, Small (pre-labeled)
- 1x DS-Biorepository Tasso Kit Specimen Form
- 1x Dry Ice Label
- 1x Therapak™ Aqui-Pak™ Absorbent Sleeve
- 1x UN3373 Shipping Label
- 1x Ziploc Bag, Large (bag containing all kit contains)
Notes for Clinical Coordinators
During Visit:
Meet with participant, obtain updated consent/assent if necessary.
Microbiome Tongue Swab Collection
Warning and Precautions
- If the participant presents with oral lesions or bleeding, they should consult their healthcare professional before using this collection kit.
- This kit contains a liquid to stabilize the sample.
- Wash with water if stabilizing liquid comes in contact with eyes or skin. Do NOT ingest.
- Do NOT lay the sponge tip down or touch any other surface once removed from the packaging.
- Ensure the participant has not consumed food or drink, smoked, or chewed gum for 30 minutes before giving their sample.
- Small items may pose a choking hazard.
- If the participant has eaten, drunk, smoked or chewed gum in the last 30 minutes, delay collection until 30 minutes has passed.
- Complete the tongue swab section of the kit biospecimen form.
- Record time of last eating.
- Record time of last drink.
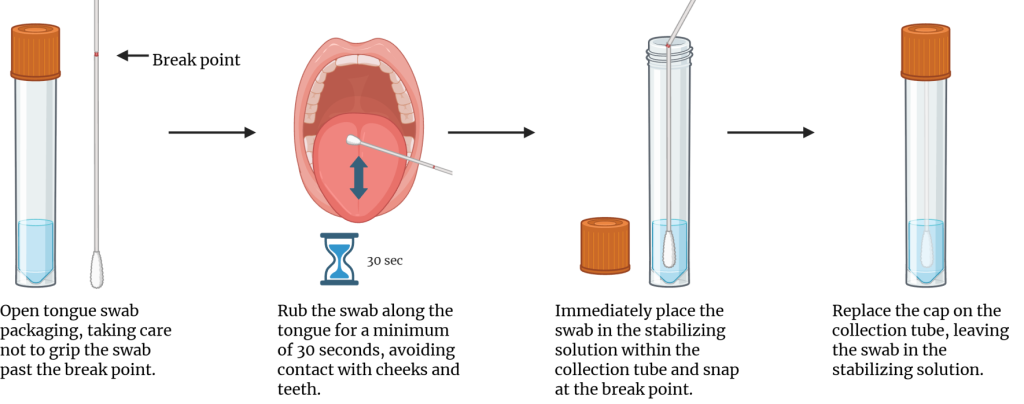
- Collect microbiome samples using the tongue swab (OMR-120). For consistency in collection, the coordinator should administer the tongue swab.
- Wear gloves when handling the swab.
- Swab tongue only for 30 seconds by rolling swab front to back along the tongue. Note that only tongue is swabbed; avoid the cheeks.
- Place swab in collection tube and carefully break off handle. Be sure not to touch the outside of the tube or any other surface with the swab.
- Replace the cap on swab.
- Record the swab collection on the provided kit biospecimen form.
Blood
TASSO + EDTA Devices
- Begin whole blood collection with the Tasso+ EDTA device. Collection video instructions can be found at: https://www.tassoinc.com/tasso-plus-kit
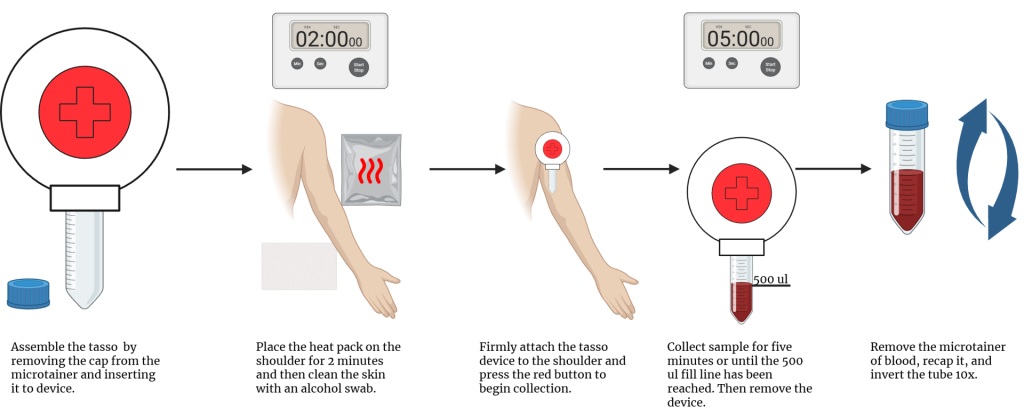
- Remove the device from the packaging. Uncap the microtainer (purple top) tube, set the purple cap aside on a clean surface, and press the tube tightly onto the Tasso device with volume fill lines facing the same side as the red button.
- Discard packaging in the trash bag.
- Follow the instructions on the heat pack found in the kit to activate. Rub the heat pack on the skin of one shoulder for 2 minutes.
- Clean the skin area with the alcohol prep pad provided in the kit.
- Discard packaging and used prep pad in the trash bag.
- Open the sterile gauze pad provided in the kit and set it aside on a clean surface.
- Remove the clear plastic cover over the red button on the Tasso device and peel the paper tab from the side opposite the red button. Discard in the trash bag.
- Stick the device firmly to the skin with the tube hanging directly below the Tasso device.
- This is a gravity-dependent device so it must be upright to fill properly.
- Prepare a 5-minute timer. After ensuring the participant is in a stable position, press the red button quickly and firmly until you hear a click, then release.
- The device should be effectively stuck to the arm. If preferred, the administrator can let go of the device or hold it in place.
- Note the time when the sample collection begins on the processing checklist.
- Start the 5-minute timer and watch the device for filling progress.
- Blood may not appear for several minutes. Monitor to make sure the blood does not fill the tube past the upper line, 500uL. When sufficiently filled, peel the device off the skin.
- If the timer ends before the device is full, remove the device.
- Press the sterile gauze pad to the collection site. Have the participant or a companion of the participant hold the gauze firmly in place.
- Use the Band-Aid provided in the kit as needed.
- Remove the tube from the device by pulling and twisting gently and place the Tasso device inside the clear processing waste bag.
- Snap the purple cap fully onto the tube until you hear a click, and flick the tube to get the blood moving, then invert 10 times to mix the sample with the anticoagulant.
- Place any packaging from the kit in the trash.
- Repeat the above steps for the second Tasso device, placing the device on the opposite shoulder.
- Place oral and blood specimens in a clear transport bag and transfer to the processing lab.
- The lab team should be available for immediate processing of samples.
- Record the time of sample collection on the collection form.
Sample Processing
Equipment Preparation
- Start the biological safety cabinet (BSC) and allow it to run for 10 minutes before use.
- Place the unlabeled small biohazard bag in the BSC to use for collecting waste.
Oral Specimen Processing
- Place the tongue swab upright at -80°C for a minimum of 2 hours, until it is frozen.
- Once frozen, place in an absorbent sleeve, transfer to the large Ziploc bag the kit came in, and store at -80°C until ready for shipment.
Plasma Isolation
- Transfer the Tasso collection tubes to an adjustable speed microcentrifuge.
- Centrifuge samples for 15:00 minutes at 700xg.
- Carefully remove the tubes from the centrifuge, move them to the biosafety cabinet, and remove the purple cap.
- Blood should be separated into 3 distinct layers: plasma on top (yellow), buffy coat in the middle (white), and RBCs bottom (red).
- Be careful not to shake or invert the tube at all, as this can mix the layers.
- Remove the 2.0 mL tubes from the white cardboard box and bring them into the biosafety cabinet along with the matrix tubes for plasma.
- Using a P200 pipet and 200 uL tips, aspirate plasma from the top surface of the plasma into a fresh 1.5 mL microcentrifuge tube (not provided), combining the plasma from both Tasso devices.
- Aspirate as much plasma as possible but leave the plasma closest to the buffy coat/RBC interface behind. It is better to isolate less plasma than to aspirate the other blood fractions into the plasma sample.
- To reduce the risk of contaminating plasma with the underlaying blood layers, the p200 pipet volume may be set as low as 20 uL and the plasma may be transferred incrementally.
- If any of the lower layers are pulled into the pipet tip, do not add them to the plasma tube.
- If the lower layers are disrupted while pipetting off the plasma, the tube can be re-centrifuged (700xg for 10 minutes) to separate the layers again. This extra spin can be done 2 additional times (3 times total) to ensure complete separation.
- Any used pipet tips can be discarded in a biohazard waste bag.
- Using a P1000 pipet, gently mix the plasma and aliquot it into the matrix tubes with 250 μL per tube.
- Set the matrix tubes upright on the dry ice for at least 30 minutes until the plasma samples are frozen.
- Mark on the kit biospecimen form that plasma was collected and note any QC issues.
- Note the approximate volume of plasma collected.
- Once frozen, transfer the plasma matrix tubes to the labeled small biospecimen bag and store at -80°C.
RNA Stabilization
- Using a P1000 pipet and 1000 μL pipet tips, transfer any remaining plasma, buffy coat, and red blood cells from ONE Tasso collection tube into the 2.0 mL microcentrifuge tube containing 1.3 mL of RNAlaterTM (provided).
- Cap the 2.0 mL tube and invert it 10 times to thoroughly mix the blood and RNAlater solution.
- Mark that the RNA sample was collected on the kit biospecimen form and note any QC issues.
Preparation of samples for DNA isolation
- Using a P1000 pipet and 1000 μL pipet tips, transfer any remaining plasma, buffy coat, and red blood cells from the remaining Tasso collection tube into the provided empty 2.0 mL microcentrifuge tube.
- Discard any remaining waste in the biohazard waste bag.
- Transfer the RNA and DNA tubes to -80°C and freeze upright, for at least 2 hours. Once frozen, transfer RNA and DNA tubes to the small biospecimen bag with the corresponding plasma sample.
- Place the small biospecimen bag into the large Ziploc bag containing the tongue swab and store at -80°C until ready for shipment.
- This kit bag now contains all biospecimens to be returned from this individual kit.
- Record collection information from the kit biospecimen form into the online DS-4C REDCap form. Retain a completed copy of the kit biospecimen form to return with specimens as well.
Child Kit Instructions for Use
Materials
Materials Supplied in Kits
- 1x Biospecimen Bag, Small (pre-labeled)
- 1x Biospecimen Bag, Medium (pre-labeled)
- 1x Biospecimen Bag, Medium
- 1x Conical Tubes, 15 mL (pre-labeled)
- 3x Cryogenic Vials, 1.2 mL (pre-labeled)
- 1x DS-Biorepository Child Kit Biospecimen Form
- 1x Dry Ice Shipping Label
- 1x Kit Contents Manifest
- 3x K2 EDTA Vacutainers, 4 mL
- 1x Liquid Medical Waste Fluid Solidifier
- 18x Matrix Tubes with Colorless Caps, 0.5 mL (pre-labeled)
- 6x Matrix Tubes with Red Caps, 0.5 mL (pre-labeled)
- 2x Microcentrifuge Tubes, 2.0 mL (pre-labeled)
- 1x Omnigene Tongue Swab (pre-labeled)
- 1x PAXgene® Blood RNA Vacutainer, 2.5 mL (pre-labeled)
- 1x PAXgene® Blood DNA Vacutainer, 2.5 mL (pre-labeled)
- 1x Therapak™ Aqui-Pak™ Absorbent Sleeve
- 1x UN3373 Shipping Label
Supplemental Materials (Supplement Kit)
- 10x Phosphate Buffered Saline (PBS)
- BD PhosflowTM Lyse/Fix Buffer
- DMSO
- Fetal Bovine Serum (FBS)
- Maxpar® buffer
- RBC Lysis Buffer
Equipment (Not Provided)
- Bead Bath or Water Bath Set to 37°C
- Class II A2 Biological Safety Cabinet
- Corning CoolCell Controlled-Rate Freezing Container or Equivalent
- -80°C Freezer
- Honeywell Xenon Ultra 1960g Barcode Sanner or Equivalent
- Liquid Nitrogen Dewar
- Liquid Nitrogen Safe Freezer Boxes
- Nutating Rotator
- P1000 Pipet
- Refrigerated Adjustable Speed Microcentrifuge (Eppendorf 5417r or Equivalent)
- Refrigerated Swinging Bucket Centrifuge with 15- mL Tube Adaptors (Allegra X-30r or Equivalent)
- Swinging Bucket Centrifuge with 15- and 50-mL Tube Adaptors (Allegra X-30 or Equivalent)
- Speed-Controlled Serological Pipet
- Timer
- Tube Racks
Consumables (Not Provided)
- 1000 uL Barrier Pipet Tips, Sterile
- Conical Tubes, 50 mL
- Conical Tubes, 15 mL
- Dry Ice
- Liquid Nitrogen
- Microcentrifuge Tubes, 1.5 mL
- Serological Pipets, 10 mL
- Transfer Pipets, 3 mL (or 1000 uL Wide-Bore Barrier Tips, Sterile)
Specimen Collection
Notes for Lab
Before Visit:
- Check the expiration date on the tongue swab and vacutainers to ensure they have not expired.
- Bring the kit biospecimen form to record collection details and note any issues during the sample collection.
- If a replacement tube is needed at any time, use a tube from the replacement kit. Fill out the proper replacement kit form (provided in the replacement kits) and attach it to the biospecimen form.
The following materials for use in sample return shipments:
- 1x Biospecimen Bag, Small (pre-labeled)
- 1x Biospecimen Bag, Medium (pre-labeled)
- 1x DS-Biorepository Child Kit Biospecimen Form
- 1x Dry Ice Shipping Label
- 1x Therapak™ Aqui-Pak™
- Absorbent Sleeve
- 1x UN3373 Shipping Label
- Ziploc bag, large (bag containing all kit contents)
Notes For Clinical Coordinators
During Visit
- Meet with participant, obtain updated consent/assent if necessary.
Microbiome Tongue Swab Collection
Warning and Precautions
- If the participant presents with oral lesions or bleeding, they should consult their healthcare professional before using this collection kit.
- This kit contains a liquid to stabilize the sample.
- Wash with water if stabilizing liquid comes in contact with eyes or skin. Do NOT ingest.
- Do NOT lay the sponge tip down or touch any other surface once removed from the packaging.
- Ensure the participant has not consumed food or drink, smoked, or chewed gum for 30 minutes before giving their sample.
- Small items may pose a choking hazard.
- If the participant has eaten, drunk, smoked, or chewed gum in the last 30 minutes, delay collection until 30 minutes has passed
- Complete the tongue swab section of the kit biospecimen form
- Record time of last eating.
- Record time of last drink.
- Collect microbiome samples using the tongue swab (OMR-120). For consistency in collection, the coordinator should administer the tongue swab.
- Wear gloves when handling the swab.
- Swab tongue only for 30 seconds by rolling swab front to back along the tongue. Note that only tongue is swabbed; avoid the cheeks.
- Place swab in collection tube and carefully break off handle. Be sure not to touch the outside of the tube or any other surface with the swab.
- Replace the cap on swab.
- Record the swab collection on the provided kit biospecimen form.
Blood Specimen Collection
- Let the phlebotomist know of any special instructions for the participant. i.e nervous about BD, hard stick.
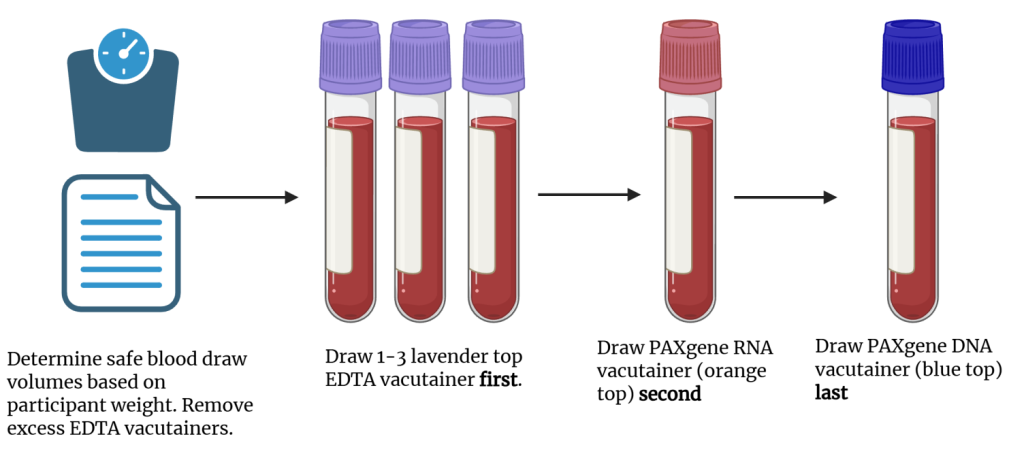
- If the participant is particularly small/slender, check with the phlebotomist that no more than 2.2 mLs/kg are drawn. The participant’s weight collected during the medical exam may be used to determine the safe amount of blood to be drawn.
- Remove the necessary EDTA tubes according to weight.
- If the participant is particularly small/slender, check with the phlebotomist that no more than 2.2 mLs/kg are drawn. The participant’s weight collected during the medical exam may be used to determine the safe amount of blood to be drawn.
- Instruct the phlebotomist to perform venipuncture in the following order. Once filled, the vacutainer should be gently inverted 8-10 times to ensure proper mixing of stabilizer and the blood.
- First, EDTA vacutainers (purple tops)
- Second, PAXgene® RNA vacutainer (orange top)
- Third PAXgene® DNA vacutainer (blue top)
If a sample is missed due to difficulties with drawing blood, ask the participant and their study partner, if present, if they would be willing to return at a later date for collection of the missing sample.
- While the blood draw is being completed, fill out specimen collection form with times of blood draw, which tubes have been collected, any draw order or other blood draw issues (e.g. pulled with blood with syringe).
- If additional sticks are necessary to complete the draw, the participant will be asked if this is ok. (No more than 3 attempts.)
- Transfer oral and blood specimens to the processing lab.
- The lab team should be available for immediate processing of samples.
Sample Processing
Equipment Preparation
- Set one swinging bucket centrifuge to 4°C and the other to room temp.
- Start the biological safety cabinet (BSC) and allow it to run for 10 minutes before use.
- Place the unlabeled medium biospecimen bag in the BSC for waste collection. Pour a small amount of fluid solidifier into the bottom of the bag.
- During sample collection, if there is not enough solidifier to soak up the waste, add more to the biohazard bag.
- Ensure the Corning CoolCell freezing container core (black ring) is at room temperature and set into the bottom of center cavity.
Reagent Preparation
- Prepare all buffers in advance in the BSC.
- 1x PBS
- 5 mL of 10x PBS with 45 mL of Sterile ultrapure water.
- Prepare 1 mL of freezing media (90% FBS,10% DMSO) for every 4 mL vacutainer filled
- Ex: 0.9 mL of FBS with 0.1 mL of DMSO.
- Keep at 4°C until used.
- 1x PBS
- Bring 1X PBS to the proper temperature.
- 20 mL of PBS at 4°C for CyTOF®-ready samples.
- 30 mL of PBS at room temp for buffy coat processing.
- Prepare two 15 mL conical tubes of 1x lyse/fix buffer (LFB) per donor for duplicate CyTOF® samples.
- Each 0.5 mL volume of whole blood processed for CyTOF® requires 10 mL 1X lyse/fix buffer.
- Mix 2mL of 5x LFB with 8mL of sterile ultrapure water in each 15mL conical.
- Warm the 1X LFB by placing it in a 37°C bead bath for 15-30 minutes before processing.
DNA, RNA, and Oral Specimen Processing
- Place the tongue swab upright at -80°C for a minimum of 2 hours, until it is frozen.
- Once frozen, place the tongue swab in an absorbent sleeve, transfer to the pre-labeled medium biospecimen bag and store at -80°C until ready for shipment.
- Place the medium biospecimen bag into the large ziploc bag the kit arrived in. This will help keep the samples consolidated for return shipments.
- Allow PAXgene® RNA and PAXgene® DNA vacutainers to sit upright at room temperature for 2 hours, transfer to -20°C overnight, then transfer to -80°C on the next business day
- When transferring the tubes to -80°C place them in the absorbent sleeves along with the tongue swab samples, and store in the medium biospecimen bag until ready for shipment.
- Place the medium biospecimen bag back into the large Ziploc bag the kit arrived in. This will help keep the samples consolidated for return shipments.
- Record the collection vacutainers on the kit biospecimen form, including participant and visit information, date, and any collection notes.
- Pull the proper number of pre-labeled tubes for biospecimen processing:
- Tubes should never be mixed or used with those from another kit, even if they are of the same type. Discard any tubes not used in this collection
- 18x 0.5 ml Matrix Tubes with Colorless Caps for Plasma
- 1x 15 ml Conical Tube for Extra Plasma
- 6x 0.5 ml Matrix Tubes with Red Caps for RBCS
- 3x 1.2 ml Cryovials for Buffy Coat
- 2x 2.0 mL Microcentrifuge Tubes for CyTOF®-Ready Samples
- Tubes should never be mixed or used with those from another kit, even if they are of the same type. Discard any tubes not used in this collection
Plasma, Buffy Coat, and RBC Isolation
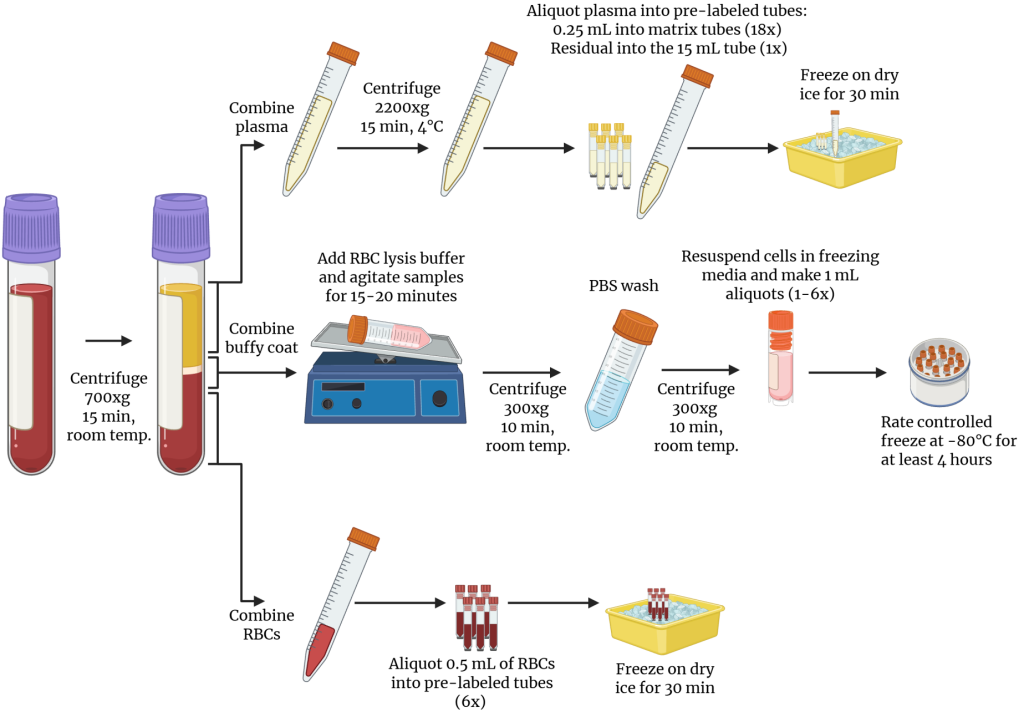
- Use EDTA vacutainers (lavender top) for isolating plasma, buffy coat, and RBCs.
- Measure the starting volume of blood from all EDTA vacutainers collected and record on the biospecimen form.
- Thoroughly mix the EDTA Vacutainers (8-10 gentle inversions). If CyTOF®-Ready Samples will be collected, then aliquot 1.1 mL of whole blood from one of the EDTA vacutainers into a 1.5 mL microcentrifuge tube (not provided) for the preparation of duplicate CyTOF®-ready samples, found in the CyTOF®-Ready Sample Preparation section.
- Centrifuge all EDTA Vacutainers at 700xg for 15 minutes at RT in a swing bucket centrifuge.
- At this point, blood should be clearly separated into three distinct layers. Plasma on top (yellow), buffy coat in the middle (white), and RBCs on the bottom (red).
- Carefully remove vacutainers from the centrifuge, without disturbing layers.
- Pull off as much plasma as possible from all tubes without disrupting the lower layers and combine into a 15mL conical tube.
- Leave 0.5-1mL of plasma above buffy coat to avoid disturbing the lower layers.
- Plasma may be collected and transferred using a variety of options including serological pipets (10 mL, 5 mL, 2 mL) or sterile transfer pipets.
- Perform an additional spin of plasma in the swinging bucket centrifuge. Centrifuge at 2200xg, 4°C for 15 minutes to pellet the remaining cell debris.
- Using a 3 mL transfer pipet, or p1000 wide-bore pipette tips, aspirate the remaining 0.5-1 mL plasma above buffy coat and an additional 1-2 mL of the buffy coat and RBC layers. Combine buffy coat layers from all vacutainers into a 50 mL conical tube.
- Set the buffy coat conical tube aside for use in step 25 for processing the buffy coat.
- From the EDTA Vacutainers, pool the remaining RBCs together into one vacutainer, mix, then aliquot into labeled matrix tubes.
- Aliquot 0.5 mL RBCs per tube into 6 matrix tubes.
- If there is a small volume of RBCs, decrease the number of aliquots.
- Cap the RBC tubes with red matrix caps and place upright, on dry ice for at least 30 minutes until the samples are frozen.
- Once frozen, transfer matrix tubes back to the small biospecimen bag provided with the kit and keep on dry ice.
- Once the additional 15-minute plasma spin is finished, remove multiple aliquots from the top of air/liquid interface into 18 labeled matrix tubes.
- Aliquot 0.25 mL of plasma per tube.
- Cap the plasma tubes with colorless matrix caps.
- Transfer any remaining plasma to the pre-labeled 15 mL conical.
- Place the plasma tubes upright, on dry ice for at least 30 minutes until the samples are frozen.
- Once frozen, transfer matrix tubes back to the small biospecimen bag provided with the kit and keep on dry ice with the 15 mL conical of plasma.
- Transfer the 15 mL conical of excess plasma to the absorbent sleeve, place it in the medium biospecimen bag and store at -80°C.
- Place the medium biospecimen bag back into the large Ziploc bag the kit arrived in.
- If CyTOF®-ready samples are NOT being collected, transfer the small biospecimen bag with the RBCs and plasma matrix tubes to large Ziploc bag the kit arrived in.
- Add 2 mL of RBC lysis buffer per 4 mL vacutainer to the buffy coat tube, cap, mix by inversion, and place on a nutating rotator until red cells lyse (the contents of the tube will be a clear dark red color) (about 15-20 mins).
- Ex: If two 4 mL vacutainers were collected, add 4 mL of lysis buffer to the buffy coat tube.
- Centrifuge the buffy coat cells for 10 minutes at room temperature at 300xg.
- Discard the supernatant slowly by decanting, being careful not to dislodge the pellet.
- Re-cap the conical tube and dislodge the pellet by gently running the tube along BSC grate.
- Add 10mL 1X room temp PBS to the buffy coat conical to wash the cells.
- Cap the tube and mix gently by inverting 3-5 times.
- Centrifuge the buffy coat cells for 10 minutes at room temperature at 300xg.
- Discard the supernatant slowly by decanting, being careful not to dislodge the pellet.
- Re-cap the conical tube and dislodge the pellet by gently running the tube along BSC grate.
- Resuspend the cells gently in 1 mL freezing media for cryopreservation per 4mL vacutainer collected.
- Ex: If two 4 mL vacutainers of blood were collected, resuspend the pooled buffy coat in a total of 2 mL of freezing media.
- Transfer 1mL of freezing media-cell suspension to each labeled 1.2mL cryogenic vial.
- Place buffy coat aliquots in a controlled-rate freezing container at -80oC for a minimum of 4 hours and no longer than two weeks.
- Once frozen, aliquots can be transferred to a box in a -80oC freezer for temporary storage (<2 weeks total at -80°C) or kept in the vapor phase of LN2 for long-term storage.
- Inventory the buffy coat, plasma, and RBC samples in the kit biospecimen form, including visit and participant information, number of aliquots, and any processing or QC notes.
- If not collecting CyTOF®-Ready Samples, record the kit IDs, participant IDs, and notes from the collection form into the online DS-4C REDCap form. Retain a copy of each collection form for return with their respective biospecimens.
CyTOF-Ready Sample Preparation
- Transfer 0.5 mL of the whole blood from the 1.5 mL tube aliquot into each of the two 15 mL conical tubes of 37°C 1X LFB.
- Start a 15-minute timer. Invert the conical tubes 5-10 times, making sure the blood is distributed in the LFB and not gathered in the bottom tip of the conical. If this step is skipped, there will be uneven and incomplete lysis.
- Immediately incubate for the remaining 15 minutes at 37°C in the bead bath or water bath. This step is time-sensitive.
- After the 15-minute incubation is complete, centrifuge at 400xg for 5 minutes at room temperature.
- Decant supernatant, re-cap the tubes, and run them gently along the BSC grate 5-10 times.
- Resuspend each cell pellet in 10mL of 1X cold PBS.
- Centrifuge at 400xg for 5 minutes at 4°C.
- Decant supernatant, re-cap the tubes, and run them gently along the BSC grate 5-10 times
- Thoroughly resuspend each cell pellet in 0.5 mL of Maxpar® buffer. Transfer the cell suspension from each conical into a new 2.0 mL microcentrifuge tube labeled with the kit barcodes
- Centrifuge at 500xg for 5 minutes at 4°C.
- Aspirate most of the supernatant (leaving 50 – 100 uL), place the tubes in the small biospecimen bag containing the RBC and plasma matrix tubes. Store the Place store the small biospecimen bag in the large Ziploc bag with the other samples at -80°C until samples are ready for shipment.
- Inventory the CyTOF®-ready samples on the kit biospecimen form, including visit and participant information, number of replicates, and any processing notes.
- After processing the samples, record the kit IDs, participant IDs, and notes from the collection form into the online DS-4C REDCap form. Retain a copy of each collection form for return with their respective biospecimens.
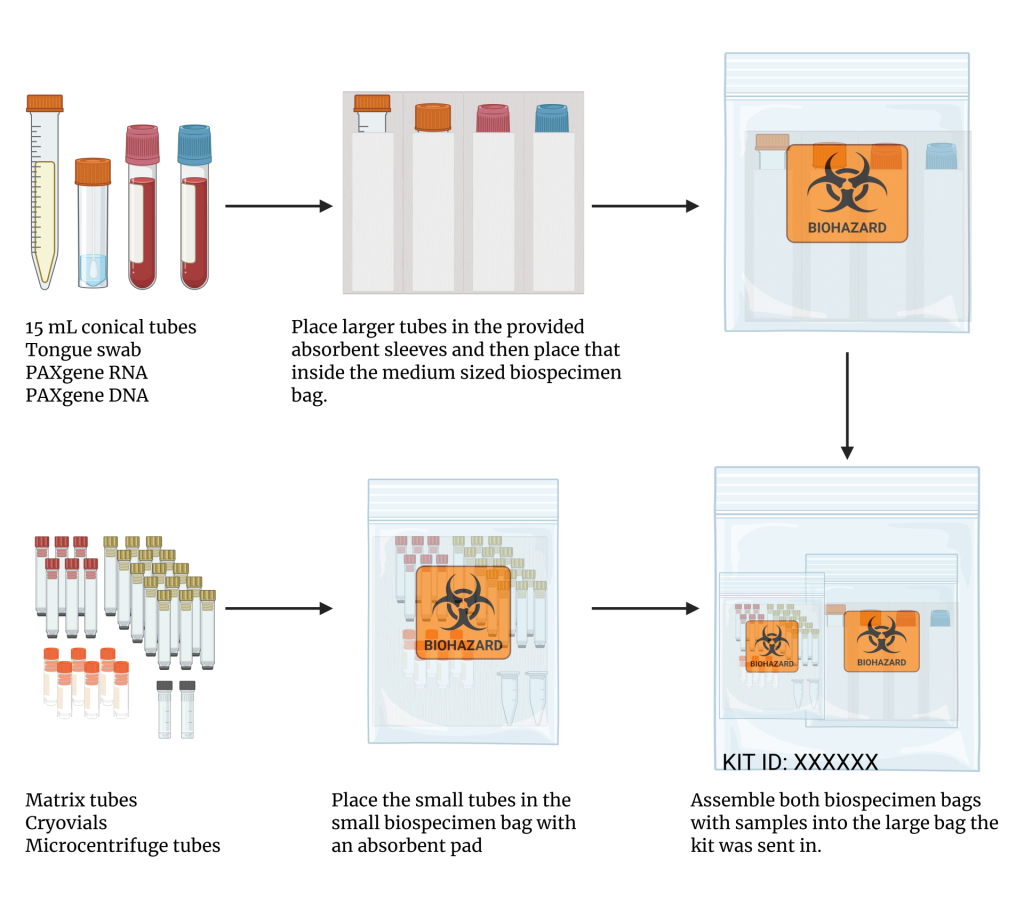
Sample Storage Review
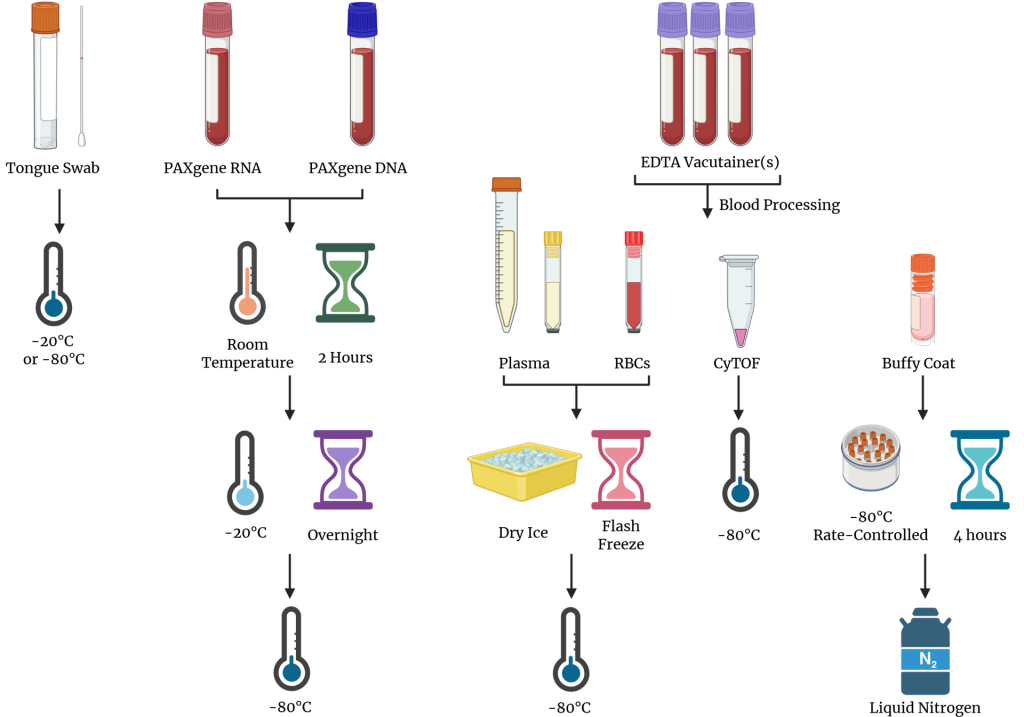
- The tongue swab, PAXgene® DNA, PAXgene® RNA, plasma, RBCs, and CyTOF®-ready samples should be stored at -80°C.
- The tongue swab, PAXgene® DNA, PAXgene® RNA, and 15 mL conical of plasma should be placed into the slots of the absorbent sleeve provided with the kit and placed in the medium biospecimen bag.
- The plasma and RBC matrix aliquots and CyTOF®-ready samples should be placed in the small biospecimen bag.
- Both biospecimen bags should be placed within the large Ziploc bag and store at -80°C until ready for shipment.
- Ensure that biospecimens from different kits are not mixed in the same bag. Each large kit bag should only contain biospecimens from that kit.
- Cryopreserved buffy coat cells must remain in vapor phase of liquid nitrogen until ready for shipment.
- Immediately before shipment, the cryogenic vials of buffy coat cells should be transferred to the small biospecimen bag, which is then placed in the large Ziploc bag.
Adult Kit Instructions for Use
Materials
Materials Supplied in Kits
- 1x Biospecimen Bag, small (pre-labeled)
- 1x Biospecimen Bag, medium (pre-labeled)
- 1x Biospecimen Bag, medium
- 1x Conical Tubes, 15 mL (pre-labeled)
- 6x Cryogenic Vials, 1.2 mL (pre-labeled)
- 1x DS-Biorepository Adult Kit Biospecimen Form
- 1x Dry Ice Shipping Label
- 1x Kit Contents Manifest
- 3x K2 EDTA Vacutainers, 10 mL
- 1x Liquid Medical Waste Fluid Solidifier
- 18x Matrix Tubes with Colorless Caps, 0.5 mL (pre-labeled)
- 6x Matrix Tubes with Red Caps, 0.5 mL (pre-labeled)
- 2x Microcentrifuge Tubes, 2.0 mL (pre-labeled)
- 1x Omnigene Tongue Swab (pre-labeled)
- 1x PAXgene® Blood RNA Vacutainer, 2.5 mL (pre-labeled)
- 1x PAXgene® Blood DNA Vacutainer, 8.5 mL (pre-labeled)
- 1x Therapak™ Aqui-Pak™ Absorbent Sleeve
- 1x UN3373 Shipping Label
Supplemental Materials (Supplement Kit)
- 10x Phosphate Buffered Saline (PBS)
- BD PhosflowTM Lyse/Fix Buffer
- DMSO
- Fetal Bovine Serum (FBS)
- Maxpar® Buffer
- RBC Lysis Buffer
Equipment (Not Provided)
- Bead Bath or Water Bath Set to 37°C
- Class II A2 Biological Safety Cabinet
- Corning CoolCell Controlled-Rate Freezing Container or Equivalent
- -80°C Freezer
- Honeywell Xenon Ultra 1960g Barcode Sanner or Equivalent
- Liquid Nitrogen Dewar
- Liquid Nitrogen Safe Freezer Boxes
- Nutating Rotator
- P1000 Pipet
- Refrigerated Adjustable Speed Microcentrifuge (Eppendorf 5417r or Equivalent)
- Refrigerated Swinging Bucket Centrifuge with 15- mL Tube Adaptors (Allegra X-30r or Equivalent)
- Swinging Bucket Centrifuge with 15- and 50-mL Tube Adaptors (Allegra X-30 or Equivalent)
- Speed-Controlled Serological Pipet
- Timer
- Tube Racks
Consumables (Not Provided)
- 1000 uL Barrier Pipet Tips, Sterile
- Conical Tubes, 50 mL
- Conical Tubes, 15 mL
- Dry Ice
- Liquid Nitrogen
- Microcentrifuge Tubes, 1.5 mL
- Serological Pipets, 10 mL
- Transfer Pipets, 3 mL (or 1000 uL Wide-Bore Barrier Tips, Sterile)
Specimen Collection
Notes For Lab
Before Visit:
- Check the expiration date on the tongue swab and vacutainers to ensure they have not expired.
- Bring the kit biospecimen form to record collection details and note any issues during the sample collection.
- If a replacement tube is needed at any time, use a tube from the replacement kit. Fill out the proper replacement kit form (provided in the replacement kit) and attach it to the biospecimen form.
The following materials for use in sample return shipments:
- 1x Biospecimen Bag, small (pre-labeled)
- 1x Biospecimen Bag, medium (pre-labeled)
- 1x DS-Biorepository Adult Kit Biospecimen Form
- 1x Dry Ice Shipping Label
- 1x Therapak™ Aqui-Pak™ Absorbent Sleeve
- 1x UN3373 Shipping Label
- Ziploc bag, large (bag containing all kit contents)
Notes For Clinical Coordinators
During Visit:
- Meet with participant, obtain updated consent/assent if necessary.
Microbiome Tongue Swab Collection
Warning and Precautions
- If the participant presents with oral lesions or bleeding, they should consult their healthcare professional before using this collection kit.
- This kit contains a liquid to stabilize the sample.
- Wash with water if stabilizing liquid comes in contact with eyes or skin. Do NOT ingest.
- Do NOT lay the sponge tip down or touch any other surface once removed from the packaging.
- Ensure the participant has not consumed food or drink, smoked, or chewed gum for 30 minutes before giving their sample.
- Small items may pose a choking hazard.
- If the participant has eaten, drunk, smoked or chewed gum in the last 30 minutes, delay collection until 30 minutes has passed
- Complete the tongue swab section of the kit biospecimen form
- Record time of last eating.
- Record time of last drink.
- Collect microbiome samples using the tongue swab (OMR-120). For consistency in collection, the coordinator should administer the tongue swab.
- Wear gloves when handling the swab.
- Swab tongue only for 30 seconds by rolling swab front to back along the tongue. Note that only tongue is swabbed; avoid the cheeks.
- Place swab in collection tube and carefully break off handle. Be sure not to touch the outside of the tube or any other surface with the swab.
- Replace the cap on swab.
- Record the swab collection on the provided kit biospecimen form.
Blood Specimen Collection
- Let the phlebotomist know of any special instructions for the participant. i.e nervous about BD, hard stick.
- If the participant is particularly small/slender, check with the phlebotomist that no more than 2.2 mLs/kg are pulled. The participant’s weight collected during the medical exam may be used to determine the safe amount of blood to be drawn.
- Remove the necessary EDTA tubes according to weight.
- Instruct the phlebotomist to perform venipuncture in the following order. Once filled, the vacutainer should be gently inverted 8-10 times to ensure proper mixing of stabilizer and blood.
- First, EDTA vacutainers (purple tops)
- Second,PAXgene® RNA vacutainer (orange top)
- Third PAXgene® DNA vacutainer (blue top)
- If a sample is missed due to difficulties with drawing blood, ask the participant and their study partner, if present, if they would be willing to return at a later date for collection of the missing sample. If the participant is unwilling or unable to return for a redraw, offer a Tasso collection as a last resort.
- While the blood draw is being completed, fill out specimen collection form with times of blood draw, which tubes have been collected, any draw order or other blood draw issues (e.g. pulled with blood with syringe).
- If additional sticks are necessary to complete the draw, the participant will be asked if this is ok. (No more than 3 attempts.)
- Transfer oral and blood specimens to the processing lab.
- The lab team should be available for immediate processing of samples.
Sample Processing
Equipment Preparation
- Set one swinging bucket centrifuge to 4°C and the other to room temp.
- Start the biological safety cabinet (BSC) and allow it to run for 10 minutes before use.
- Place the unlabeled medium biospecimen bag in the BSC for waste collection. Pour a small amount of fluid solidifier into the bottom of the bag.
- During sample collection, if there is not enough solidifier to soak up the waste, add more to the biohazard bag.
- Ensure the Corning CoolCell freezing container core (black ring) is at room temperature and set into the bottom of center cavity.
Reagent Preparation
- Prepare all buffers in advance in the BSC.
- 1x PBS
- 5 mL of 10x PBS with 45 mL of Sterile ultrapure water.
- 1.2. Prepare 2 mL of freezing media (90% FBS,10% DMSO) for every 10 mL vacutainer filled
- Ex: 1.8 mL of FBS with 0.2 mL of DMSO.
- Keep at 4°C until used.
- 1x PBS
- Bring 1X PBS to the proper temperature.
- 20 mL of PBS at 4°C for CyTOF®-ready samples
- 30 mL of PBS at room temp for buffy coat processing
- Prepare two 15 mL conicals of 1x lyse/fix buffer (LFB) per donor for duplicate CyTOF® samples.
- Each 0.5 mL volume of whole blood processed for CyTOF® requires 10 mL 1X lyse/fix buffer.
- Mix 2mL of 5x LFB with 8mL of sterile ultrapure water in each 15mL conical.
- Warm the 1X LFB by placing it in a 37°C bead bath for 15-30 minutes before processing.
DNA, RNA, and Oral Specimen Processing
- Place the tongue swab upright at -80°C for a minimum of two hours, until it is frozen.
- Once frozen, place the tongue swabs in an absorbent sleeve, transfer to the pre-labeled medium biospecimen bag and store at -80°C until ready for shipment.
- Place the medium biospecimen bag into the large Ziploc bag the kit arrived in. This will help keep the samples consolidated for return shipments.
- Allow PAXgene® RNA and PAXgene® DNA vacutainers to sit upright at room temperature for 2 hours, transfer to -20°C overnight, then transfer to -80°C on the next business day.
- When transferring the tubes to -80°C place them in the absorbent sleeves along with the tongue swab samples, and store in the medium biospecimen bag until ready for shipment.
- Place the medium biospecimen bag back into the large Ziploc bag the kit arrived in. This will help keep the samples consolidated for return shipments.
- Record the collection vacutainers on the kit biospecimen form, including participant and visit information, date, and any collection notes.
- Pull the proper number of pre-labeled tubes for biospecimen processing:
- Tubes should never be mixed or used with those from another kit, even if they are of the same type. Discard any tubes not used in this collection
- 18x 0.5 ml Matrix Tubes with Colorless Caps for Plasma
- 1x 15 ml Conical Tube for Extra Plasma
- 6x 0.5 ml Matrix Tubes with Red Caps for RBCS
- 6x 1.2 ml Cryovials for Buffy Coat
- 2x 2.0 mL Microcentrifuge Tubes for CyTOF-Ready Samples
- Tubes should never be mixed or used with those from another kit, even if they are of the same type. Discard any tubes not used in this collection
Plasma, Buffy Coat, and RBC isolation
- Use EDTA vacutainers (lavender top) for isolating plasma, buffy coat, and RBCs.
- Measure the starting volume of blood from all EDTA vacutainers collected and record on the biospecimen form.
- Thoroughly mix the EDTA Vacutainers (8-10 gentle inversions). If CyTOF®-Ready Samples will be collected, then aliquot 1.1 mL of whole blood from one of the EDTA vacutainers into a 1.5 mL microcentrifuge tube (not provided) for the preparation of duplicate CyTOF®-ready samples, found in the CyTOF®-Ready Sample Preparation section.
- Centrifuge all EDTA Vacutainers at 700xg for 15 minutes at RT in a swing bucket centrifuge.
- At this point, blood should be clearly separated into three distinct layers. Plasma on top (yellow), buffy coat in the middle (white), and RBCs on the bottom (red).
- Carefully remove vacutainers from the centrifuge, without disturbing layers.
- Pull off as much plasma as possible from all tubes without disrupting the lower layers and combine into a 15mL conical tube.
- Leave 0.5-1mL of plasma above buffy coat to avoid disturbing the lower layers.
- Plasma may be collected and transferred using a variety of options including serological pipets (10 mL, 5 mL, 2 mL) or sterile transfer pipets.
- Perform an additional spin of plasma in the swinging bucket centrifuge. Centrifuge at 2200xg, 4°C for 15 minutes to pellet the remaining cell debris.
- Using a 3 mL transfer pipet, aspirate the remaining 0.5-1 mL plasma above buffy coat and an additional 1-2 mL of the buffy coat and RBC layers. Combine buffy coat layers from all vacutainers into a 50 mL conical tube.
- Set the buffy coat conical tube aside for use in step 25 for processing the buffy coat.
- From the EDTA Vacutainers, pool the remaining RBCs together into one vacutainer, mix, then aliquot into labeled matrix tubes.
- Aliquot 0.5 mL RBCs per tube into 6 matrix tubes.
- If there is a small volume of RBCs, decrease the number of aliquots.
- Cap the RBC tubes with red matrix caps and place upright, on dry ice for at least 30 minutes until the samples are frozen.
- Once frozen, transfer matrix tubes back to the small biospecimen bag provided with the kit and keep on dry ice.
- Once the additional 15-minute plasma spin is finished, remove multiple aliquots from the top of air/liquid interface into 18 labeled matrix tubes.
- Aliquot 0.25 mL of plasma per tube.
- Cap the plasma tubes with colorless matrix caps.
- Transfer any remaining plasma to the pre-labeled 15 mL conical.
- Place the plasma tubes upright, on dry ice for at least 30 minutes until the samples are frozen.
- Once frozen, transfer matrix tubes back to the small biospecimen bag provided with the kit and keep on dry ice with the 15 mL conical of plasma.
- Transfer the 15 mL conical of excess plasma to the absorbent sleeve, place it in the medium biospecimen bag and store at -80°C.
- Place the medium biospecimen bag back into the large Ziploc bag the kit arrived in.
- If CyTOF®-ready samples are NOT being collected, transfer the small biospecimen bag with the RBCs and plasma matrix tubes to large Ziploc bag the kit arrived in.
- Add 4 mL of RBC lysis buffer per 10 mL vacutainer to the buffy coat tube, cap, mix by inversion, and place on a nutating rotator until red cells lyse (the contents of the tube will be a clear dark red color) (about 15-20 mins).
- Ex: If two 10 mL vacutainers were collected, add 8 mL of lysis buffer to the buffy coat tube.
- Centrifuge the buffy coat cells for 10 minutes at room temperature at 300xg.
- Discard the supernatant slowly by decanting, being careful not to dislodge the pellet.
- Re-cap the conical tube and dislodge the pellet by gently running the tube along BSC grate.
- Add 20mL 1X room temp PBS to the buffy coat conical to wash the cells.
- Cap the tube and mix gently by inverting 3-5 times.
- Centrifuge the buffy coat cells for 10 minutes at room temperature at 300xg.
- Discard the supernatant slowly by decanting, being careful not to dislodge the pellet.
- Re-cap the conical tube and dislodge the pellet by gently running the tube along BSC grate.
- Resuspend the cells gently in 2 mL freezing media for cryopreservation per 10mL vacutainer collected.
- Ex: If two 10 mL vacutainers of blood were collected, resuspend the pooled buffy coat in a total of 4 mL of freezing media.
- Transfer 1mL of freezing media-cell suspension to each labeled 1.2mL cryogenic vial.
- Place buffy coat aliquots in a controlled-rate freezing container at -80oC for a minimum of 4 hours and no longer than two weeks.
- Once frozen, aliquots can be transferred to a box in a -80oC freezer for temporary storage (<2 weeks total at -80°C) or kept in the vapor phase of LN2 for long-term storage.
- Inventory the buffy coat, plasma, and RBC samples in the kit biospecimen form, including visit and participant information, number of aliquots, and any processing or QC notes.
- If not collected CyTOF®-Ready Samples, record the kit IDs, participant IDs, and notes from the collection form into the online DS-4C REDCap form. Retain a copy of each collection form for return with their respective biospecimens.
CyTOF-Ready Sample Preparation
- Transfer 0.5 mL of the whole blood from the 1.5 mL tube aliquot into each of the two 15 mL conicals of 37°C 1X LFB.
- Start a 15-minute timer. Invert the conical tubes 5-10 times, making sure the blood is distributed in the LFB and not gathered in the bottom tip of the conical. If this step is skipped, there will be uneven and incomplete lysis.
- Immediately incubate for the remaining 15 minutes at 37°C in the bead bath or water bath. This step is time-sensitive.
- After the 15-minute incubation is complete, centrifuge at 400xg for 5 minutes at room temperature.
- Decant supernatant, re-cap the tubes, and run them gently along the BSC grate 5-10 times.
- Resuspend each cell pellet in 10mL of 1X cold PBS.
- Centrifuge at 400xg for 5 minutes at 4°C.
- Decant supernatant, re-cap the tubes, and run them gently along the BSC grate 5-10 times
- Thoroughly resuspend each cell pellet in 0.5 mL of Maxpar® buffer. Transfer the cell suspension from each conical into a new 2.0 mL microcentrifuge tube labeled with the kit barcodes
- Centrifuge at 500xg for 5 minutes at 4°C.
- Aspirate most of the supernatant (leaving 50 – 100 uL), place the tubes in the small biospecimen bag containing the RBC and plasma matrix tubes. Store the Place store the small biospecimen bag in the large Ziploc bag with the other samples at -80°C until samples are ready for shipment.
- Inventory the CyTOF®-ready samples on the kit biospecimen form, including visit and participant information, number of replicates, and any processing notes.
- After processing the samples, record the kit IDs, participant IDs, and notes from the collection form into the online DS-4C REDCap form. Retain a copy of each collection form for return with their respective biospecimens.
Sample Storage Review
- The tongue swab, PAXgene® DNA, PAXgene® RNA, plasma, RBCs, and CyTOF®-ready samples should be stored at -80°C.
- The tongue swab, PAXgene® DNA, PAXgene® RNA, and 15 mL conical of plasma should be placed into the slots of the absorbent sleeve provided with the kit and place in the medium biospecimen bag.
- The plasma and RBC matrix aliquots and CyTOF®-ready samples should be placed in the small biospecimen bag.
- Both biospecimen bags should be placed within the large Ziploc bag and store at -80°C until ready for shipment.
- Ensure that biospecimens from different kits are not mixed in the same bag. Each large kit bag should only contain biospecimens from that kit.
- Cryopreserved buffy coat cells must remain in vapor phase of liquid nitrogen until ready for shipment.
- Immediately before shipment, the cryogenic vials of buffy coat cells should be transferred to the small biospecimen bag, which is then placed in the large Ziploc bag.
Saliva Kit Instructions for Use
Materials
Materials supplied in Kits
- 1x Biospecimen Specimen Bag, medium (pre-labeled)
- 1x Dry Ice Shipping Label
- 1x DS-Biorepository Saliva Kit Specimen Form
- 1x Kit Contents Manifest
- 1x Oragene Saliva Kit (pre-labeled)
- 1x Therapak™ Aqui-Pak™ Absorbent Sleeve
- 1x UN3373 Shipping Label
Equipment (Not Provided)
- -80°C Freezer
Specimen Collection
The saliva collection kits may be used with or without an assisting sponge. If the participant is able to spit into the collection tube without the sponge, they may do so by following the manufacturer’s instructions provided with the kit. Instructions for sponge assisted saliva collection are detailed below. Regardless of the method, 2 mL of saliva must be collected. The appropriate amount of saliva is indicated by the fill line on the tube.
Assisted Saliva Collection
Warning and Precautions
- If the participant presents with oral lesions or bleeding, they should consult their healthcare professional before using this collection kit.
- This kit contains a liquid to stabilize the sample.
- Wash with water if stabilizing liquid comes in contact with eyes or skin. Do NOT ingest.
- Ensure the participant has not consumed food or drink, smoked, or chewed gum for 30 minutes before giving their sample.
- Small items may pose a choking hazard.
- Check the sponge for damage before use. Two sponges are provided if one shows any signs of damage.
- Place one sponge in the cheek pouch and gently move it along the gums and inner cheek for 30 seconds to absorb as much saliva as possible.
- After the sponge is saturated, insert it into the V-shaped notch of the collection tube.
- Wringing the sponge out by twisting and pushing it against the inner wall of the notch, filling the tube with saliva.
- Using the same sponge, repeat the process until the liquid, not the bubbles, reaches the fill line.
- Check the sponge for damage before each repeated use. If the sponge shows signs of wear and tear, use the second sponge.
- Tap the tube bottom against a hard surface to help remove bubbles.
- Hold the base of the tube upright in one hand and close the lid firmly with the other hand.
- A loud click should be heard, and the liquid in the lid will be released into the tube to mix with the saliva.
- Unscrew the funnel from the tube.
- Use the small cap to seal the tube tightly.
- Shake the capped tube for five seconds.
- Place the saliva tube upright, at -80°C, for at least 2 hours, until samples are frozen.
- Saliva samples may be frozen and stored at -80°C or -20°C.
- Once frozen, place the saliva sample in an absorbent sleeve, transfer to the pre-labeled medium biospecimen bag and store at -80°C, or -20°C, until ready for shipment.
- Place the medium biospecimen bag into the large Ziploc bag the kit arrived in.
- Record the kit IDs, participant IDs, and notes from the collection form into the online DS-4C REDCap form. Retain a copy of the collection form for return with the biospecimen.